Beezid

Monday, May 27, 2013

How-To Arrange Desktop Icons

Be the first to comment! Posted by Hannah on 5:09 PM

How-To Arrange Desktop IconsToday we are going to learn How-To arrange Icons on your computer desktop.
Just so we are clear on the instructions here is a picture of a desktop.  The computer desktop itself is the picture of the hills and clouds! 
The Icons on the desktop in the picture are named:  My documents, My Computer, Recycle Bin, and Internet Explorer.
I’m normally asked a couple of questions about arranging desktop icons or organizing the icons on the desktop.  So lets go quickly over a couple of different options!
First I will go over some more traditional ways to organize your icons, and they show you a way you can organize they WAY you want THEM!
Topics covered today will be:
  • How-To Find Arrange Desktop Icons Menu
  • What is ‘auto arrange’, and how to turn that option off and on.
  • Sort Icons by options, and What do the different options Mean?
  • How To Arrange the Desktop Icons where I want them, and how to organize them by using the Grid. 
  • How to Arrange the Desktop Icons how I want them, and NOT use the grid
First lets go to the spot where all the magic happens!  We need to find the menu to do ALL the changes NEEDED!

Arrange Desktop Icons

We want to find an open space on your computer desktop, and then right click with your mouse pointer ON the desktop, and NOT on top one of the icons.
For example you notice the mouse pointer in the above picture is NOT on top of any of the desktop icons pictured.
Below I have pictured menus that will come up depending on your operating system
Right Click on Desktop
This would be Right Click on Desktop for Windows XP, and we are hovering over the ‘arrange icons by” option. (notice how its highlighted in DARK blue when you hover over it) 
right click on desktop Vista
Right Click on Computer Desktop Menu for Windows Vista when you hover OVER the “View” Option.  Notice how VIEW looks different in the background color compared to the other options.  In this lesson we will be using the ‘view’ area.
right click on desktop windows 7
Menu for Windows 7 when you hover over the “VIEW” option that we will use today. 
Keep in mind you may have to use this step over and over again to make all the changes you want to your computer desktop.  When you select just ONE change the menu above will disappear, and you have to do this step all over again to make the next change. 

How-To Turn on Auto Arrange Desktop Icons

With any of the above operating systems you need to find an item on the list called, ‘auto arrange icons’. Look at the pictures above to see where you might find that option.
If you want the icons to be automatically arranged, click Auto Arrange.  This option is normally done by Default.
check auto arrange
If you see the check mark next to auto arrange that means you have selected it, or it maybe already selected for you (ie: by default). 

How do you turn OFF Auto Arrange Icons?

uncheck auto arrange
Of course absence of the check mark means you have removed the option of the computer desktop being automatically arranged. 
So if you want to turn OFF the auto arrange which is normally the ‘default’ setting for computer desktops hover down and CLICK this option to remove the check mark.  It should look similar to my picture above when turn OFF this option.
At this point the menu should disappear altogether after you made your choice.  If not?  Click on the computer desktop again.

Arrange Icons By Options

Right Click on Desktop
In the Windows XP menu you will see in the above picture a couple of different options. 
What do the arrange Icons By options mean?
Name  -  Arrange icons in alphabetical order by the icon name.
Size  -  Arrange icons in order of file size. If the icon is a shortcut to a program, the size refers to the size of the shortcut file.
Type  -  Arrange icons in order of type. For example, if you have shortcuts to several PowerPoint presentations on your desktop, these will be arranged next to each other.
Modified  -  Arrange icons in the order that the shortcut was last modified.
Hover over to your option, and click on the option you feel is the best for you.  YES you can change that option if you don’t like it to something else!  Just start over by right clicking on desktop once again.
You can find these sort by options for Windows Vista and Windows 7 as well.
Remember to right click on that free space on the desktop once again, and then look for the ‘sort by’ option.
right click on desktop windows 7
You notice the arrow on the right side of this optiVista Icon Sort By Optionson?  If you hover over the SORT by the list of options will appear. 

You are able to pick which you would like to use, or change the option once again if you don’t like it.
Just hover down to your option, and CLICK on it when it highlights.
Your menu should disappear once you make your changes, and if you not?  Click on computer desktop.

Organize Desktop Icons The Way I Want Them

You can move your desktop Icons anywhere you want them on your computer Desktop.
computer desktop
When you have the Auto Arrange Option Clicked – or is in use by default you can’t move your icons around to places you may want them.
The picture above you will see icons arranged all around his picture of a cool car, and an airplane.  You also notice his icons are still lined up, but placed where he decided to put them! 
How do you do that?
First, you need to make sure your ‘auto arrange’ option is turned off like we showed you above.  Right Click on Desktop, and look for this option to make sure check mark is removed.  Hover over and click on the option if it is NOT!
uncheck auto arrange
Notice NO check mark?  It has been turned off!
Now some people still like to see SOME sense of order as far as the icons being lined up orderly.  The computer desktop has what is called a gird.
Once again – right click on computer desktop.
In Windows XP you will find the option for the grid under the Arrange Icons By section. 
Notice that the auto arrange doesn’t have a check mark next to it, but the align to Grid does? (list on right side, under NAME)
Right Click on Desktop
These are the options you want!
right click on desktop windows 7
Windows Vista and Windows 7 are similar, but hover over the ‘VIEW’ section.  Notice the ‘auto arrange icons’ is NOT checked, but the ‘Align Icons to Grid’ is?  That is what you WANT!
right click on desktop windows 7
Now if the grid is to restrictive for you?  You of course do not have to use that option!

Arranging Icons on Your Computer Desktop

I will tell you if you are NEW computer user, or have a new computer at times these menus can be frustrating.  They disappear before your able to make the changes you want, or the menu seems to close before you can see anything.
Be patient, and go a bit slower at times to figure out how sensitive your machine can be.  Its not usual to have to do this a couple of times, and it happens the best of US!
I will mention at times you may need to refresh you computer desktop to see the changes you have done.  When you right click on your computer desktop?  Look for the ‘refresh’ option, and hover over to click on it.  The screen sometimes flutters a bit, and then you can see your finished product!  Most of the time with newer machines this isn’t needed.  You see your changes right away!
I hope our lesson on Desktop Icon Arrangement was helpful!
If something is not clear, or you feel something should be added to our lesson? Please feel free to leave your comment or question in section we provided.


Also please subscribe by leaving your email in the box supplied, and you will received future lessons by email as they come out.

Thank you for reading our How-To Guide for the Computer Beginner

Sunday, May 19, 2013

What is a Cloud?

Be the first to comment! Posted by Hannah on 6:45 PM

Cloud Computing Australia

What is the Cloud?

Today we are going to write about the term ‘The Cloud”.

No doubt you have heard the term before either in print, or in the media.

What is the Cloud?  Its basically a fancy word for online storage space.

Storing something in the cloud is basically storing something on what they call a computer server at a different location.    If you look at the picture those TALL machines (on the right and left) are examples of computer servers.

Confused yet?  Let me give you a more basic example!

Where is the Cloud?

yahoo email old screen grab

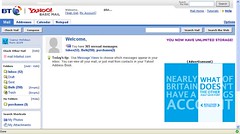
Let’s say you have an email account at home with Yahoo, and you sign into your Yahoo account to see if you have any emails (the above picture).  The server at Yahoo SENDS those emails to your account so you can read them (From your web browser or internet browser).  Those emails were basically being stored on the server, and that technically is in the ‘cloud’.  Yahoo’s servers ARE the storage space.  They are the ‘cloud’ in this example.

In this case, Where is the Cloud?  At Yahoo!

email inbox

No doubt you have noticed the folders in your email program similar the ones  I have pictured here.  The inbox, Draft, Sent, Bulk, Trash, and in this case a custom folder the computer user made called ‘purchases’.

Unless you delete the emails in these folders they will forever be stored in the ‘cloud’ at Yahoo.  They will be there each and every time you sign into your yahoo email account online.  Your emails are stored at Yahoo on their computer servers (their cloud), and can be accessed anywhere you sign into your email account.

Yes, ANYWHERE you sign IN!

Other basic examples of Clouds would be Facebook, Google Doc’s, or Flicker.

The all have their own servers, so those are all different Clouds!  People can upload their documents to Google Doc’s, or pictures to Flicker!  Depending on the service access to your files, pictures, etc can be limited to you, a group you choice, or open to the public.  You need to read the terms for each location.

What do you do in the Cloud?

Lets say for example, you are at Fran’s house on vacation.  You are expecting some pictures from your grandchildren’s soccer game, and they were going to email them to you.  Fran tells you to use her computer to see if they have emailed them to you yet, because she wants to see them TOO!

You go to the Yahoo website, and you sign into your account – like you do at home! Since your emails are stored on the yahoo cloud – and NOT your home computer – you can access your new emails from Fran’s house.   Now you and Fran are enjoying the soccer pictures! 

It would be the same principal if you stayed a hotel near Fran’s house, and the lobby of the hotel has a computer with internet connection for their guests to use. Yahoo’s servers (the cloud) will send those emails to you WHERE EVER you are!  As long as you don’t delete the email those pictures will stay in cloud for as LONG as you keep them there!

Another example of how to use the cloud would be to upload those soccer pictures to flicker, or some other site you choose to display your photos!  This would be a separate cloud, because they have their own servers.  Granted, some sites like google have many different aspects to their services.  For example, they are connected to youtube.  So your Google Docs and Youtube Videos are both on GOOGLE clouds – or their servers.

Most of the time when we speak of computer storage it refers to our computer itself!  For example, you are starting to write a article using your Word Program about your trip to Germany for a newsletter.  When you are done working on it for the day you ‘save it’ on the computer’s hard drive, disk drive, or maybe even a CD Rom for example.  All your work is saved, and you can finish it later!

The cloud has the same principal of storage, but the storage is ONLINE! 

What is Cloud Computing?

So you are still at Fran’s house, and she is going to Germany next year.  She wants to see what you have written so far about your trip!  Unless you have your computer with you, or your disk drive, or CD rom you won’t be able to show her.  Right?  You would have to be at YOUR computer at home to open it, and then show her the story for the newsletter.

Now if you have stored your article in the Cloud (online storage server), and your friend Fran has a computer with internet connection?  You can sign into that storage cloud where your file is – place the computer file in HER word program – and she can read it.  In some cases you can even read it online IN the cloud itself (in the computer browser)!

Let me use a more basic example!

So lets pretend that you uploaded your Germany article to Google docs (short for documents).  While you are at Fran’s house you can both read the article, and lets say Fran sees you have misspelled a word.  You can correct your grammar right there, and once you get home the document will still be corrected.  Yes, its similar to how you SAVE your work on your computer as well!  You are basically doing it online!

The cloud is a place some people use as a backup for their computer files.  That way if their computer broke, or a tragedy happened like your house caught on fire?  The computer maybe gone, but your files are still in the CLOUD online.  Think of it as ‘off sight’ storage!

Businesses can use the cloud in a similar way as we saw Fran help you with your misspelled word on your article.  They can have a group project ‘in the cloud’, and the employees can all work on the project in REAL TIME!  For example, Jack wants to add a picture to make the point more clear.  Jane feels a graph is also needed.  Jack could be in New York, and Jane could be in Texas.  Since they are in cloud?  They can both add these things, and they the both can see the additions. 


I hope these basic examples of What is the Cloud, Where is the Cloud, What do you do in the Cloud, and What is Cloud Computing helps you understand these terms more.

If something is not clear, or you feel something should be added to our lesson? Please feel free to leave your comment or question in section we provided.


Also please subscribe by leaving your email in the box supplied, and you will received future lessons by email as they come out.

Thank you for reading our How-To Guide for the Computer Beginner

Friday, January 4, 2013

How-To Get SIMS 3 to work with Windows 8 Computer

20 Comments so far Posted by Hannah on 1:55 PM

I'm writing this due to my experience with the kids SIMS 3 program.  I had purchased Windows 8 netbooks (The new fancy word for laptops), and they truly enjoyed it.  All was well until they tried to install their SIMS 3 program.  Yes, we got the same type of errors that everyone else has been getting.

windows 8 computer sims 3


Is the SIMS 3 program Compatible with Windows 8?

I can't tell you that what I do here will do the job for everyone else, but I sure do hope it works for you like it has for us.   There was alot of talk about Bit Defender (a program) conflicting with the SIMS 3 software, but we didn't have that program installed.  Thus I had to look for other options.

For us?  Windows 8 is compatible with SIMS 3.  You can’t install the program like you would normally is what I found.  If you have YET to install any aspect of the SIMS 3 program on your windows 8 machine?  Skip the Revo uninstaller portion, but do start downloading the patch I link to before you do install SIMS 3 ANYTHING on your windows 8 computer!

If you have installed any portion of the SIMS 3 program on your Windows 8 computer – like my kids did – follow our instructions to completely remove all aspects of it off your machine.

Yes, SIMS 3 support does show you how to do this manually.  I found it is a pain in the butt, and REVO uninstaller can do it quicker.  Heck it may even remove files they aren’t thinking about at EA support.

Below we will speak about completely removing the SIMS 3 off your computer as if it never existed prior.  So you will need to find a way to save your game progress, the extras you may have purchased, etc.  Once you follow my instructions they will not be on your computer anymore.  Save them now before going forward.

I had spoken to EA support line at length a number of days ago, and I followed all their instructions to the tea.  I found after all that work I still had the same stupid error while trying to install SIMS 3 on their Windows 8 machine. I gathered my patience for the next day, and decided that I would try this my way using some of the principals they spoke about on the phone.

Before we start make sure all of your windows updates are complete!

The first thing I did was download what EA support called the SIMS 3 Super Patcher.

Sims 3 Super Patcher

If you look at the file size it seems large to me – it starts with a TS.  I downloaded this to my desktop, and while I waited for it to finish I  did the following to get my Windows 8 machine READY to work with our Sims 3 program.

I would make a ‘restore’ point on your computer in case you have any issues later on. That way if you have any problems you can restore your computer to an earlier time. The Revo Uninstaller does this as well, but I make a practice of doing this manually anyway.

Use Revo Uninstaller to remove SIMS 3 from your Windows 8 Computer

I went to download a free program called, Revo UnInstaller.  You will notice that they have a free option, and what they called a PRO (or professional) option.  I will be purchasing the PRO version at a later date, but to get the ball rolling on the Sims 3 program on their Windows 8 machine?  I used the free version of the program.

Revo Uninstaller Sims 3 Windows 8

If you look to the bottom of the screen it will give you a link to download this freeware.  I did notice on the windows 8 machine that it started to install itself, and yet sent me to some webpage asking me if I wanted to also download some other program.   I didn’t use the second program they wanted to advertise, but finished installing Revo Uninstaller completely.

Once I launched the Revo Uninstaller on windows 8 computer it will scan your system for all installed programs.  This can take some time if you have plenty of programs already on the Windows 8 machine.

Once the scan is completed - you have some options along the top of the menu.  Select the uninstall option.  (see 1)

Look below and FIND your program icon that you are going to remove – see 2 (it will remove everything - not just icon).

By the way, in my picture below I didn’t use a SIMS 3 icon as an example.


Right click on program icon
Select Uninstall (see 2)

revo uninstaller windows 8

It will prompt you asking you if you are want to uninstall program - click yes.
Next Screen is 'Select an Uninstall Mode" I picked 'advanced' on bottom – then click next

revo uninstall mode

Next Screen is 'Performing the initial analysis and uninstall' screen.

At this point you will see the a list of  4 jobs it will be doing, and in the meantime your normal SIMS uninstall wizard will run.  If you have time to read the 4 steps listed in the Revo uninstaller program?  Step four on the REVO screen it tells you this will happen. 

performing the initial analysis and uninstall

(Keep in mind the REVO uninstaller will launch the SIMS Installshield wizard automatically for you - you don't have to do that part.)

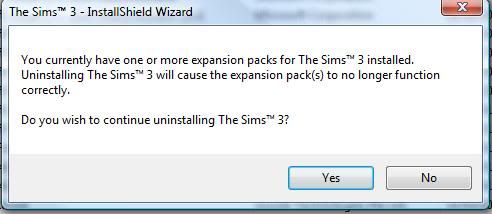
Leave the REVO program alone for now, and run the SIMS uninstall wizard until its completed.  No doubt you will get this message in the picture below, and Click YES this is what we are trying to accomplish!

Do all the steps that the InstallShield Wizard for the SIMS 3 program is asking you to do. 

Once you hit the FINISH button on the wizard – the wizard will close automatically. 

Your Revo Uninstaller Screen should be the only thing present, and you want to hit the ‘next’ button at that point on the Revo Program.

revo next analysis

‘Scanning for leftover information’ screen will be running.  Allow it to finish. then Click NEXT

revo scanning for leftover information


Found Leftover files and Folder or Registry screen will be next. 

revo found leftover registry items

Click 'select all', and then click "delete'. 

You will then get a message, 'are you are you want to send the selected files to the recycle bin?"  Click Yes. 

Scan will happen and when its done - click next.

You may get additional screens afterwards with different names, but we will do the same actions that we did above.  Just select all, delete, YES I want to send to recycle bin– and next!

Do this until the program is DONE! and then click finish.

revo finish

I did the same to remove SIMS 3, all extension packs, and origin using this program.

Once SIMS program, all the extensions, and Origin have been removed - remember to empty your recycle bin.

Sims 3 Super Patcher for the Windows 8 Computer

This is just me, but once I do all this work?  I normally restart the computer as well.  It may not be needed, but that's just me as I said.

I was told to install the SIMS 3 super patcher prior to the SIMS 3 program (ea support line), but it would not allow it due to no SIMS program on system at all at this point.  THIS was a great sign for me! The program is completely GONE!

I reinstalled Origin.  Signed in - went to 'my games' and only installed the SIMS 3 program.  I will not run this program, because I want to do install the super patcher program first (per EA support).  So in others words DON'T hit play when its done!

I then went to my super patcher for SIMS 3 download (first item we downloaded above), and executed the program.  Hopefully, by this time your download we started at the beginning is finished.  It took a while to run, and I left the computer completely alone to let it do its thing.

Once the patch was completely installed?  I was getting excited, and I crossed my fingers and did a little prayer while I launched the SIMS 3 base program.  I almost fainted when it actually did what it was suppose to. 

I told my daughter to let the SIMS 3 program load completely, and don't download any extensions until the program is done loading EVERYTHING!

Sims 3 is Compatible with Windows 8 computers

I instructed her to download one extension at a time - let it load all the junk it needs to - add her purchases, extras, update files etc. on each expansion pack ONE AT A TIME! 

Once she was SURE everything was working on that pack?  Move to the next one.  Do the same thing.

I told her if ONE expansion pack screws up?  STOP, and we will look for the next solution.  At that point you know it’s the expansion pack, and NOT the SIMS 3 program if another error occurs.

So Far so good...we will see, and I hope my journey helped others!  Her SIMS 3 program is actually working on our Windows 8 computer.  Yes, it was an annoying adventure but at least its done for now.

Saturday, February 11, 2012

Get In and Get Out of Safe Mode

Be the first to comment! Posted by Hannah on 11:08 PM

what-is-safe-modeToday’s How-To Guide for the computer beginner we are going Start Safe mode, and learn how to get OUT of safe mode!

In a past article we spoke about what is safe mode.  Now we will learn how to get to safe mode, and we will then learn about the different safe mode options.

For now… Here are a list of questions we will cover today:
What is Booting to safe mode?
How to start windows in safe mode?
How to get safe mode?
How do i get to safe mode?
How to start in safe mode?
What is Restart in Safe Mode?
How-To get out of safe mode?
We will touch on all of these questions today!

What Is Safe Mode?

Be the first to comment! Posted by Hannah on 10:32 PM

what-is-safe-modeToday’s How-To Guide for the computer beginner we are going to touch on what is Safe Mode?
Our Next Article will cover booting or starting your computer in Safe Mode.
Our First question is:

What is Safe Mode?

Microsoft’s Definition of Safe Mode is:
Safe mode is a troubleshooting option for Windows that starts your computer in a limited state. Only the basic files and drivers necessary to run Windows are started. The words "Safe Mode" appear in the corners of the display to identify which Windows mode you are using. If an existing problem does not reappear when you start in safe mode, you can eliminate the default settings and basic device drivers as possible causes.

To me safe mode is a trouble shooting mode when your computer is having problems. 
Examples of when you may see safe mode is:
Holiday Gift Guide: Save up to 50% on Christmas Gift Ideas at BarnesandNoble.com. Spend $25 to get FREE Shipping!