Beezid
Showing posts with label basic-computer-operation. Show all posts

Tuesday, September 24, 2013

Where is the Start Menu for Windows 8?

Be the first to comment! Posted by Hannah on 8:43 PM

Today’s How-To Guide for the computer beginner is about the Start menu for Windows 8.

We will be covering very briefly:

Where is the Start Menu in Windows 8
What is an App
What Is The Charms Bar, and the Charms themselves.
(I have animations at the very bottom on how to get the charms bar to appear using the mouse and touchscreen.)Windows Start Menu

Where is the start menu for Windows 8?

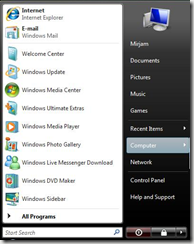
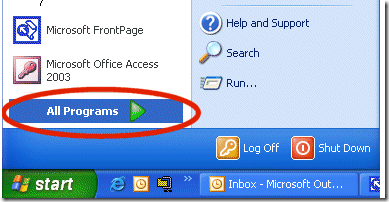
Here is a picture of a traditional start menu.

Well Microsoft wants to change things UP a bit now.

Microsoft no longer has what we have called in the past a ‘start menu’, but now they have what they called a start screen

They have basically moved the entire start menu onto what was once the traditional spot for our desktop

That is NOT to say that Windows no longer has a traditional desktop anymore.  THEY DO! 
We will get to that later, but lets move on….
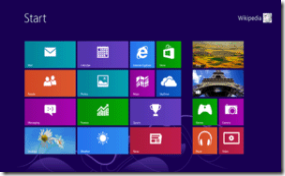
Windows_8_Start_Screen_Start_MenuHere I have a picture of the start screen, but keep in mind your start screen may look a bit different.

Microsoft states it has expanded the Start menu, turning it into a full-screen launching pad for your programs.  

It seems what they are trying to do is combine a tablet type of device with the traditional computer. 

Most will say if you are going to get a computer with Windows 8 today a ‘touchscreen’ is a must.  That is NOT to say you can’t use a regular mouse as we have in the past.  Tablets are touchscreen, and instead of clicking as we normally would – we touch!

What is an APP?

Another NEW term they are using today instead of programs is APPS.

I honestly don’t see the big difference between what they call a ‘app’ and a program myself.  Windows 8 does have apps that can only be used on a Windows 8 machine.  That seems to be the only difference between the two.  If it is only for a Windows 8 machine?  They call it an app.

Another important NOTE is if your program runs on Windows 7?  It will still run on Windows 8.  So you don’t have to go out, and buy all NEW software!  That is a GOOD thing yes?!

If you have a fancy phone with ‘apps’ on it?  Windows 8 is the same principal.  You can go to the Windows 8 store, and buy apps (or programs) for your new computer.  In time no doubt there will all kinds of different apps, and YES even for free!

The manufacturer of your computer basically picked the programs, or what they called APPS onto your start screen presently.  That doesn’t mean you have to keep them, or you can’t change the appearance of your start screen to programs you would rather use.

What confused my teenagers is that they didn’t know where the rest of their programs – or apps – were. 

Since you no longer have a start button, or a option to click for ‘all programs’ like we did in the past?  What now?

What is the Charms Bar, and what are Charms?

Move your cursor  to the top right side of the screen – or bottom right hand of the screen.  If you have a touch screen?  Glide your finger to this portion of your screen.

You notice when you do this a Charm Bar comes up.  I’m pointing to it below, and placed a red box around it.
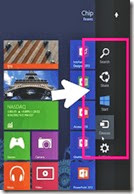
Charms menu
Notice you have 5 prominent ones.

Top magnifying glass is the Search Charm.

Second is a Share charm.

Third is the Windows Charm, and brings you back the start screen

Forth is the Device Charm

and Finally the last one is the Settings Charm.

Now if you glide your mouse (or finger) down in the Charms area they turn from almost transparent to a solid form.

Let’s Click on the Search Charm – or tap if you have touch screen.
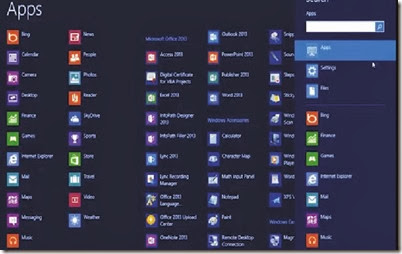
Search Charm Apps Search

Now you can type in the white box above to search for the program – or app – you maybe looking for.

We will go into more detail at a later date.  I will tell you if you ever want to get back to the start screen again?
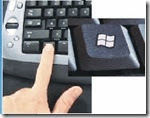
Windows 8 Windows key
Look on your keyboard for the Windows Key, and you click it.

We will also be writing more about the Charms menu at a later date, because it maybe one of the MOST important parts of this new operating system called, “Windows 8”.

Just a reminder!  The Start menu is now the Start screen in Windows 8.
Below is a brief video made by Dell Computers, and it gives you a visual on how to do the above if you have touchscreen.
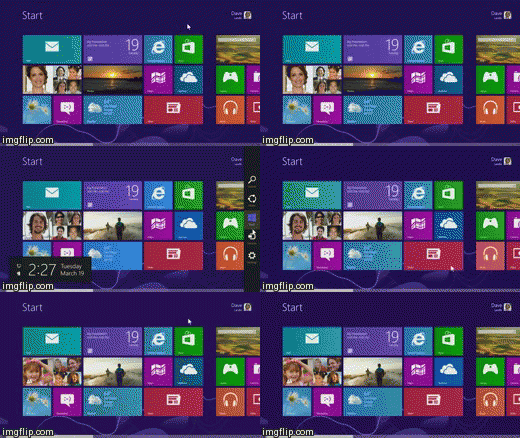
Windows 8 Start Screen for Touch Screen Computers

Here is a animation on how to use the mouse to make the Charms bar Appear.

Here is an animation on how to use your finger and touchscreen to make the Charms Bar Appear.

If something is not clear, or you feel something should be added to our lesson? Please feel free to leave your comment or question in section we provided.


Also please subscribe by leaving your email in the box supplied, and you will received future lessons by email as they come out.

Thank you for reading our How-To Guide for the Computer Beginner lesson today on Where is the Start Menu for Windows 8?  Its call the Start Screen Now.

Tuesday, June 11, 2013

What is the Default Printer or Primary Printer?

Be the first to comment! Posted by Hannah on 8:00 PM

Today’s How-To Guide for the computer beginner lesson we will talk about the  “Default Printer”.

Keep in mind that Default Printer and Primary Printer are the same thing.  I have noticed that people use both terms for this.  Yes, most of the time they mean the same thing.

The Topics covered today are:
  • What is the default printer?  What is the primary Printer?
  • How do I identify which printer is my default printer? Or Primary Printer?
  • How do I change my default printer or primary printer?

What is the Default Printer Or Primary Printer?

list of printersThe Default Printer is basically the Primary Printer you want to setup to use to print with.  Keep in mind we are using a machine, and YES you need to tell the machine WHICH printer you are going to use MOST of the time! 

Your computer will DEFAULT to this printer whenever you want to print something.  That is NOT to say you can’t change your mind, and use a different one you may have.  That’s possible of course, but there will be a default printer.  This primary printer  the computer will automatically use unless you tell the computer otherwise.
Depending on your circumstance at your computer location one printer should be already set as the ‘default’ printer. 
I have noticed that some computers switch the default or primary printer for various reasons, and people think their printer or computer is broken.  Checking the default maybe the only thing you need to fix.
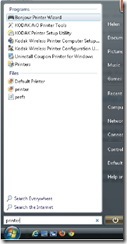
One thing I have noticed from time to time is certain software will change your primary printer to something that works better (in their opinion) for their program. In the picture above I was on a friend’s computer, and clicked the start button and searched for ‘printer’. 

software printers
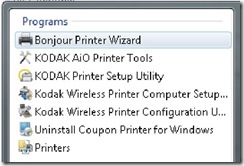
Here is a close up shot, and keep in mind my friend wants the ‘Kodak’ printer as her primary printer, or default printer.  Notice the Bonjour and the Coupon printer on the list?  Those are examples of extras that some software programs ADD, because it works better with their program.  These are two examples of MANY of course!

So how do you know which printer is the primary printer or the default printer?

What printer is my default printer or primary printer?

Most of the time when you are looking for the primary or default printer is because you are having some sort of printing problem.  It could also be that your printer died, and you bought a new one…yet that isn’t printing!
There can be many reasons WHY all of a sudden a printer isn’t working.  So check a couple of things first, and then we will make sure your ‘choice’ of printer is set as the default or primary printer.
  • Are the Cables or Cords loose?  Are they connected where they need to be?
  • Is the power on for the printer?
  • Is there enough ink, or is there paper in the printer?
Okay.  Now that you have checked those LETS move ON!

You need to go to your control panel on your computer.  If you don’t know what that is click on the words control panel in the last sentence, and it will bring you to a lesson to show you HOW to find it!
(In Windows XP click Start button, then select Printers and Faxes.
In Windows Vista click Start button, click Control Panel, click Hardware and Sound, click Printers.
In Windows 7 click Start button, click Devices and Printers.)

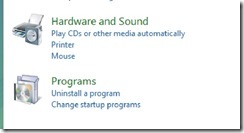
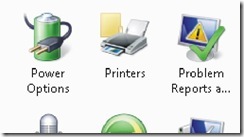
We need to find the printer section of the control panel, and click on that.  Below are two printer sections on the control panel.  Printers are considered a piece of hardware on your computer!

control panel hardware printer Select to change to default or primary printer


Notice above you find the word ‘printer’ under hardware and sound. 
classic view printer control panel to change to primary printer default printer
If you have a classic view of the control panel your icons above will be in alphabetical order, and you need to find the ‘printer/s’ icon.

Now that you located the printer section in the control panel click on that section to open the next screen.

list of printers in control panel hardware section

Keep in mind some screens may look a little different, but you are looking for the ‘names’ of the printers!  Your screen could be pictures of the printers, or a list of printers.   Don’t worry its basically the same thing – all we need to concern ourselves with is the NAMES of the printers!  You notice above I have three listed above. The Kodak, Microsoft XPS, and Snagit 10. 

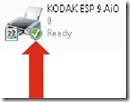
kodak default printer or primary printer see green check mark to identifyNotice my friend’s Kodak ESP 9 AiO printer in the picture?  That is her primary or default printer.  I can tell because you notice it as the green checkmark.  Your printer may not show a green check mark, but there should be some check – or symbol showing you THIS is the default or primary printer! 

Notice that the other printers do NOT have this symbol!  You are you basically looking for something that is different – in this case the green check mark – to identify which is the primary printer or what the computer calls the default printer.

How do you change the Primary Printer or the Default Printer?


list of printers in control panel hardware section

As I mentioned above the Kodak printer in this picture is the default printer.  What if I wanted to change it to the Microsoft XPS document printer instead?

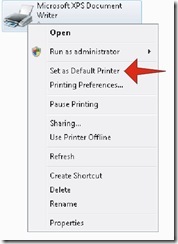
Click on that Microsoft Printer, and it will highlight to show you have selected it.Set as Default Printer Option Primary Printer  Notice the light blue box around it?  In this picture I have also right clicked, and you see the menu options.

You would then move your mouse pointer DOWN to ‘Set as Default Printer’, and click once the ‘set as default printer’ is highlighted. 

Please note:  Some computer are picky on how far the mouse pointer can go (left or right), and you find the menu disappears if you go over to far.  Just try it again, and go slower until you find that soft spot your particular computer likes.

There is a second way to do this within the same menu if you have trouble with the options above.

Set As Default option to select primary Printer
Notice once again I clicked the Microsoft Printer, and its highlighted.  Now look to the top of the menu box, and you see the words, ‘set as default’.  Click on that spot.  You check mark should change to the printer you have chosen.

new default printer
See how easy is that?
You change this as often as you want – or need too.  Most people don’t change it at all. 

If something is not clear, or you feel something should be added to our lesson? Please feel free to leave your comment or question in section we provided.


Also please subscribe by leaving your email in the box supplied, and you will received future lessons by email as they come out.

Thank you for reading our How-To Guide for the Computer Beginner
and our Lesson on the Default or Primary Printer!

Monday, May 27, 2013

How-To Arrange Desktop Icons

Be the first to comment! Posted by Hannah on 5:09 PM

How-To Arrange Desktop IconsToday we are going to learn How-To arrange Icons on your computer desktop.
Just so we are clear on the instructions here is a picture of a desktop.  The computer desktop itself is the picture of the hills and clouds! 
The Icons on the desktop in the picture are named:  My documents, My Computer, Recycle Bin, and Internet Explorer.
I’m normally asked a couple of questions about arranging desktop icons or organizing the icons on the desktop.  So lets go quickly over a couple of different options!
First I will go over some more traditional ways to organize your icons, and they show you a way you can organize they WAY you want THEM!
Topics covered today will be:
  • How-To Find Arrange Desktop Icons Menu
  • What is ‘auto arrange’, and how to turn that option off and on.
  • Sort Icons by options, and What do the different options Mean?
  • How To Arrange the Desktop Icons where I want them, and how to organize them by using the Grid. 
  • How to Arrange the Desktop Icons how I want them, and NOT use the grid
First lets go to the spot where all the magic happens!  We need to find the menu to do ALL the changes NEEDED!

Arrange Desktop Icons

We want to find an open space on your computer desktop, and then right click with your mouse pointer ON the desktop, and NOT on top one of the icons.
For example you notice the mouse pointer in the above picture is NOT on top of any of the desktop icons pictured.
Below I have pictured menus that will come up depending on your operating system
Right Click on Desktop
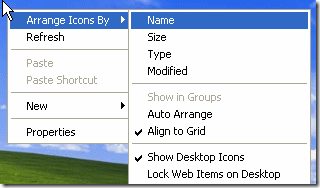
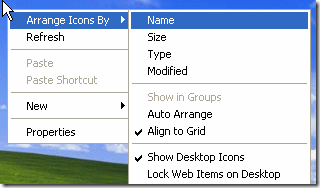
This would be Right Click on Desktop for Windows XP, and we are hovering over the ‘arrange icons by” option. (notice how its highlighted in DARK blue when you hover over it) 
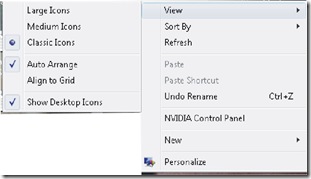
right click on desktop Vista
Right Click on Computer Desktop Menu for Windows Vista when you hover OVER the “View” Option.  Notice how VIEW looks different in the background color compared to the other options.  In this lesson we will be using the ‘view’ area.
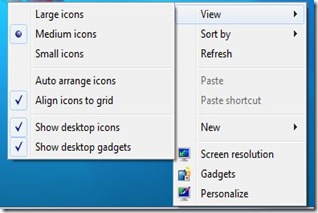
right click on desktop windows 7
Menu for Windows 7 when you hover over the “VIEW” option that we will use today. 
Keep in mind you may have to use this step over and over again to make all the changes you want to your computer desktop.  When you select just ONE change the menu above will disappear, and you have to do this step all over again to make the next change. 

How-To Turn on Auto Arrange Desktop Icons

With any of the above operating systems you need to find an item on the list called, ‘auto arrange icons’. Look at the pictures above to see where you might find that option.
If you want the icons to be automatically arranged, click Auto Arrange.  This option is normally done by Default.
check auto arrange
If you see the check mark next to auto arrange that means you have selected it, or it maybe already selected for you (ie: by default). 

How do you turn OFF Auto Arrange Icons?

uncheck auto arrange
Of course absence of the check mark means you have removed the option of the computer desktop being automatically arranged. 
So if you want to turn OFF the auto arrange which is normally the ‘default’ setting for computer desktops hover down and CLICK this option to remove the check mark.  It should look similar to my picture above when turn OFF this option.
At this point the menu should disappear altogether after you made your choice.  If not?  Click on the computer desktop again.

Arrange Icons By Options

Right Click on Desktop
In the Windows XP menu you will see in the above picture a couple of different options. 
What do the arrange Icons By options mean?
Name  -  Arrange icons in alphabetical order by the icon name.
Size  -  Arrange icons in order of file size. If the icon is a shortcut to a program, the size refers to the size of the shortcut file.
Type  -  Arrange icons in order of type. For example, if you have shortcuts to several PowerPoint presentations on your desktop, these will be arranged next to each other.
Modified  -  Arrange icons in the order that the shortcut was last modified.
Hover over to your option, and click on the option you feel is the best for you.  YES you can change that option if you don’t like it to something else!  Just start over by right clicking on desktop once again.
You can find these sort by options for Windows Vista and Windows 7 as well.
Remember to right click on that free space on the desktop once again, and then look for the ‘sort by’ option.
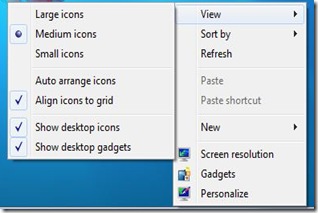
right click on desktop windows 7
You notice the arrow on the right side of this optiVista Icon Sort By Optionson?  If you hover over the SORT by the list of options will appear. 

You are able to pick which you would like to use, or change the option once again if you don’t like it.
Just hover down to your option, and CLICK on it when it highlights.
Your menu should disappear once you make your changes, and if you not?  Click on computer desktop.

Organize Desktop Icons The Way I Want Them

You can move your desktop Icons anywhere you want them on your computer Desktop.
computer desktop
When you have the Auto Arrange Option Clicked – or is in use by default you can’t move your icons around to places you may want them.
The picture above you will see icons arranged all around his picture of a cool car, and an airplane.  You also notice his icons are still lined up, but placed where he decided to put them! 
How do you do that?
First, you need to make sure your ‘auto arrange’ option is turned off like we showed you above.  Right Click on Desktop, and look for this option to make sure check mark is removed.  Hover over and click on the option if it is NOT!
uncheck auto arrange
Notice NO check mark?  It has been turned off!
Now some people still like to see SOME sense of order as far as the icons being lined up orderly.  The computer desktop has what is called a gird.
Once again – right click on computer desktop.
In Windows XP you will find the option for the grid under the Arrange Icons By section. 
Notice that the auto arrange doesn’t have a check mark next to it, but the align to Grid does? (list on right side, under NAME)
Right Click on Desktop
These are the options you want!
right click on desktop windows 7
Windows Vista and Windows 7 are similar, but hover over the ‘VIEW’ section.  Notice the ‘auto arrange icons’ is NOT checked, but the ‘Align Icons to Grid’ is?  That is what you WANT!
right click on desktop windows 7
Now if the grid is to restrictive for you?  You of course do not have to use that option!

Arranging Icons on Your Computer Desktop

I will tell you if you are NEW computer user, or have a new computer at times these menus can be frustrating.  They disappear before your able to make the changes you want, or the menu seems to close before you can see anything.
Be patient, and go a bit slower at times to figure out how sensitive your machine can be.  Its not usual to have to do this a couple of times, and it happens the best of US!
I will mention at times you may need to refresh you computer desktop to see the changes you have done.  When you right click on your computer desktop?  Look for the ‘refresh’ option, and hover over to click on it.  The screen sometimes flutters a bit, and then you can see your finished product!  Most of the time with newer machines this isn’t needed.  You see your changes right away!
I hope our lesson on Desktop Icon Arrangement was helpful!
If something is not clear, or you feel something should be added to our lesson? Please feel free to leave your comment or question in section we provided.


Also please subscribe by leaving your email in the box supplied, and you will received future lessons by email as they come out.

Thank you for reading our How-To Guide for the Computer Beginner

Saturday, February 11, 2012

Get In and Get Out of Safe Mode

Be the first to comment! Posted by Hannah on 11:08 PM

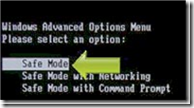
what-is-safe-modeToday’s How-To Guide for the computer beginner we are going Start Safe mode, and learn how to get OUT of safe mode!

In a past article we spoke about what is safe mode.  Now we will learn how to get to safe mode, and we will then learn about the different safe mode options.

For now… Here are a list of questions we will cover today:
What is Booting to safe mode?
How to start windows in safe mode?
How to get safe mode?
How do i get to safe mode?
How to start in safe mode?
What is Restart in Safe Mode?
How-To get out of safe mode?
We will touch on all of these questions today!

What Is Safe Mode?

Be the first to comment! Posted by Hannah on 10:32 PM

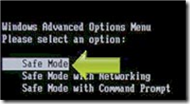
what-is-safe-modeToday’s How-To Guide for the computer beginner we are going to touch on what is Safe Mode?
Our Next Article will cover booting or starting your computer in Safe Mode.
Our First question is:

What is Safe Mode?

Microsoft’s Definition of Safe Mode is:
Safe mode is a troubleshooting option for Windows that starts your computer in a limited state. Only the basic files and drivers necessary to run Windows are started. The words "Safe Mode" appear in the corners of the display to identify which Windows mode you are using. If an existing problem does not reappear when you start in safe mode, you can eliminate the default settings and basic device drivers as possible causes.

To me safe mode is a trouble shooting mode when your computer is having problems. 
Examples of when you may see safe mode is:

Thursday, February 9, 2012

Safe Mode Windows Vista XP Seven 7

Be the first to comment! Posted by Hannah on 11:17 PM

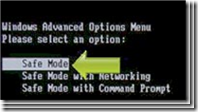
what-is-safe-modeToday’s How-To Guide for the computer beginner we are going to touch on Safe Mode for Windows 7, XP and Vista


This is one in a series of articles on safe mode, and we cover other operating systems as well.

Our first was What is Safe Mode, and then we covered getting in and out of safe mode in a general manner.

How to start a Windows Vista / Windows 7  / Windows XP operating system in safe mode

restart-computer

  • We will be restarting your computer so make sure you prepare your computer for that by removing disks, saving documents, and closing programs.

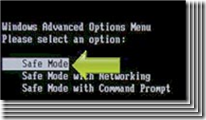
    Click on Start button and then click the arrow next to the Lock button and then click restart.  Allow the computer to completely shut down first.  Then…

Safe Mode Windows 2000

Be the first to comment! Posted by Hannah on 11:16 PM

Safe-Mode-Windows-2000Today’s How-To Guide for the computer beginner we are going to touch on Safe Mode for Windows 2000.


This is one in a series of articles on safe mode, and we cover other operating systems as well.

Our first was What is Safe Mode, and then we covered getting in and out of safe mode in a general manner.

How to start a Windows 2000 operating system in safe mode

Windows 2000 doesn't have the system configuration utility and can only be started in safe mode by using the F8 key during system startup.

Safe Mode Windows 98 Windows ME

Be the first to comment! Posted by Hannah on 11:14 PM

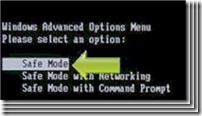
what-is-safe-modeToday’s How-To Guide for the computer beginner we are going to touch on Safe Mode for Windows 98 or Windows ME.


This is one in a series of articles on safe mode, and we cover other operating systems as well.

Our first was What is Safe Mode, and then we covered getting in and out of safe mode in a general manner.

How to start a windows 98/ME  operating system in safe mode

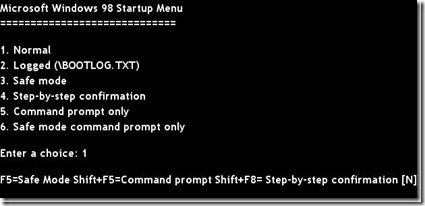
windows-98-me-safe-mode


Method 1(Most commonly used):

Safe Mode Windows 95

Be the first to comment! Posted by Hannah on 11:12 PM

Safe-Mode-Windows-95Today’s How-To Guide for the computer beginner we are going to touch on Safe Mode for Windows 95.


This is one in a series of articles on safe mode, and we cover other operating systems as well.

Our first was What is Safe Mode, and then we covered getting in and out of safe mode in a general manner.

How to start a Windows 95 operating system in safe mode

Windows 95 AGAIN doesn't have the system configuration utility and can only be started in safe mode by using the F8 key during system startup.

Tuesday, August 16, 2011

How-to Do a manual Windows Update

Be the first to comment! Posted by Hannah on 4:13 PM

We have now answered the questions:

What is windows update?

How do you set automatic windows updates for Vista, Windows 7, or automatic windows updates for XP

If you noticed in our What is Windows update lesson I showed you a pictured of the task bar that at times gives you a notification to check your windows updates.

windows-update-notification
In today’s How-To Guide for the Computer Beginner we will cover

How-to Manually check a windows update

If you have set your computer up for the automatic updates as we did in the past lesson your computer could be:
  1. Telling you that you have some optional updates to look at.
  2. The updates became available recently, and your scheduled update has not occurred since the availably.
I would say those are most common.

We would want to double click on the icon in our task bar that appeared in your notification area – as pictured above.
change-settings-windows-update
In this example, I have both important updates and optional updates.

How-To allow Windows Updates to run automatically in Windows XP

Be the first to comment! Posted by Hannah on 4:05 PM

In Windows XP you can configure your windows update to be done automatically.  In a past lesson we explained What is a Windows Update?

Today’s How-To Guide For the Computer Beginner we will learn:
How-To allow Windows XP Updates to run automatically.

Windows Updates For Windows XP

In Windows XP we want to click on our start button, and in the search box type in ‘windows update’. 
XP-Windows-start-windows-update
XP-Windows-Update-Selection
We are going to make sure your computer settings are set to do the windows updates automatically.
xp-windows-update-settings
Look to the left hand side of this new window, and we want to click on ‘settings’.
Once you open t

How-To allow Windows Updates to run automatically in Vista or Windows 7

Be the first to comment! Posted by Hannah on 4:02 PM

In Windows Vista or Windows Seven (7) you can configure your windows update to be done automatically.  In a past lesson we explained What is a Windows Update?

Today’s How-To Guide For the Computer Beginner we will learn:
How-To allow Windows Updates to run automatically.

Updates For Windows

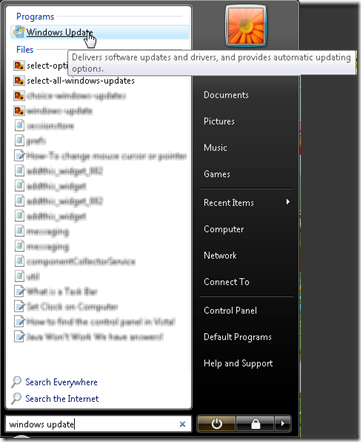
In Windows Vista or Windows 7 we want to click on our start button, and in the search box type in ‘windows update’.  You will see at the top of the start menu the option for Windows update as seen below, and we want to click on windows update to open a new screen
find-windows-update
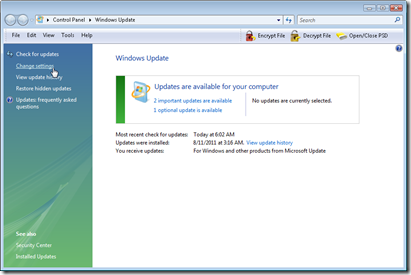
Once the new window appears it will note the windows updates that are available for your computer.  We are going to make sure your computer settings are set to do the windows updates automatically.
change-settings-windows-update
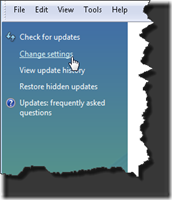
Look to the left hand side of this new window, and we want to click on ‘change settings’.
change-settings
Holiday Gift Guide: Save up to 50% on Christmas Gift Ideas at BarnesandNoble.com. Spend $25 to get FREE Shipping!