Welcome!
Today on How-To Guide for the Computer Beginner we will be learning about computer screensavers. In today’s lesson we will show you how to turn on your screen saver, or turn off your screensaver.
See the cat ready to attack those fish in that screensaver on the computer? (giggles) I love it!
The Start of the Computer Screen Saver
 Screensavers were originally designed to protect computer monitors from phosphor burn-in.
 Early CRT monitors, particularly monochrome ones, had problems with the same image being displayed for a long time on your monitor.
The phosphors, used to make the pixels in the display, would glow at a constant rate for such a long period of time that they would actually discolor the glass surface of the CRT.
This discoloration would then be visible as a faint image overlaying whatever else was displayed on the monitor. I tried to find a clear picture of what is meant by screen burn in, but as you can imagine its hard to take a picture of it. This orange screen above you can see segments of the letters, and rows. Those images were burnt permanently on your screen.
Luckily, with advances in display technology and the advent of energy-saver monitors have virtually eliminated the need for screensavers. But we still use them, because they are FUN!
I remember using a black screen with bright green letters when I worked for a company years ago, and the screen I used most often was pretty much BURNT into the screen forever! I have to say monitors have come a long way baby! The old ones I think are responsible for the glasses I have to wear now.

It dawned on me that maybe people don't know how to turn them OFF or even turn them ON for their computer! THIS part will be easy! I promise!
We will start with the most recent operating systems, and then show you how to turn on the screen saver, or turn off the screen saver with older operating systems.
How-To turn on your Screen Saver

Then right click on the desktop, and you should see a 'personalize' section!

Click Personalize. A personalization section will open up with the newer operating systems.

This personalization screen will give you a couple of options, but we are looking for ‘screensaver’ today.
The screen saver option should look similar to this screen shot below

At this point you will click on the blue letters that say, ‘Screen Saver’ at the top.
You will then be presented with a new screen.

If you look towards the middle you will have a pull down menu that gives you choices that you have available on your computer.
The list in the screen shot here starts with 3D test, Acer, etc. Yes, they are all assigned a name.
You also have two different ways of previewing the screen saver before you make your decision on which one you want to use.
I will select ‘bubbles’ for today. When I click on the ‘bubbles’ screensaver from the drop down list I will be able to get a small preview within the picture on the top.

Now if you are ANYTHING like me? This section is way to small for me to get an idea of what the bubbles truly look like.
I want to be able to see it full screen, so I truly understand what the screen saver looks like. People with better eyes than me may not have that issue.
If you look at the screen shot above you have a ‘preview’ button. This will allow the screen saver to give a true idea as to what it will look like on your computer monitor. To stop the preview? Just move your mouse, click your mouse, or hit a key on your keyboard. It will bring back your option screen without all the graphics. TRY in now!
 Not all your options for screensavers will give you information on the ‘settings’ button. Some screen savers offer you settings, and some do not. Bubbles in my case did not, and gave me a message telling me that.
 I wanted to be sure you knew what the settings button would look like IF you screen saver offers one. What is neat is you can play with how you want your screen saver to display. Some have sounds, dome to do. Select your option in the drop down menus that they offer you, and click on ‘okay’ to see the differences. Remember your ‘preview’ options we already spoke about.

Lets go back to the original settings screen so I can point out additional options to you. We will be moving right below your screen saver choices.

The ‘wait’ section asks you how many minutes do you want your screen to stay ‘idle’ before the screen saver starts up. I would call this a timer.
For example, lets say you were working on your computer and you hear the doorbell ring. You leave your computer on, and go to answer the door. Your computer would be ‘idle’ at that point. Pick how many minutes you would wish the computer to stay idle before the screen saver starts. Click the up or down arrows next to the number to make your selection.
‘On resume, display logon screen’ box.
I personally don’t use this option. If you click to leave an check in that box you will have to sign on to your computer once you come back. It would be the same sign on your use (if you use one) once you turn on the computer for your screen name.
I also don’t fool with the power settings.
Lastly, when you are done making your decisions? You would click ‘apply’, and at times you also need to click ‘okay’.
How-to Turn off Your Screen Saver
If you didn’t notice in the drop down options for which screen saver to use? Lets look at that portion again!

The first choice you have on your list is called, ‘NONE’.
So if I wanted to shut off my bubbles screen saver, and not have one at all? I would use that same screen list. I would select – NONE!
Again then hit ‘apply’ and possibly ‘okay’ as well. You have NOW turned off your screen saver!
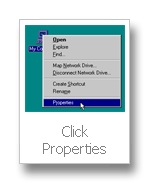
For Older Operating Systems the process is similar. Instead of selecting ‘personalize’ from your desktop options you will be looking for ‘properties’.

See the below video for a visual!
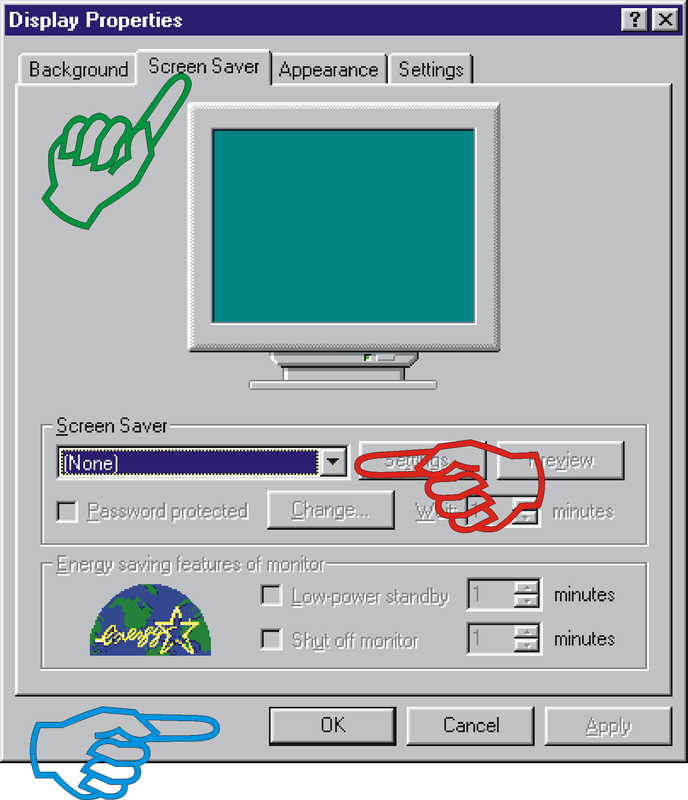
Below is a Windows 95 properties screen!
Green finger shows the 'screensaver' tab!
Red Finger shows you the pull down menu!
Blue shows you the apply and OK buttons to push when you are done with your selection!

Keep in mind most of the older systems will have similar looks, and the directions are the same!
They might have made the screen saver options look a bit more fancy, but the principal is the same!
If you look next to that 1/2 globe you will see an option there so you can tell the computer how many minutes you wish it to wait to turn on your screensaver!
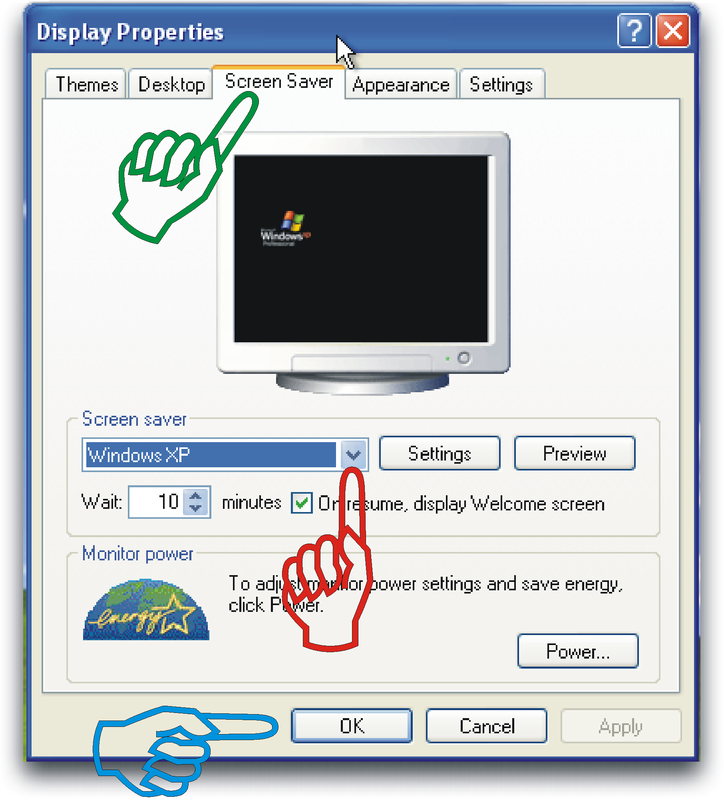
How-To Turn on or Turn Off Screen Saver in Windows XP
The image right below that one is of Windows XP, and you can see the screensaver principals are the same! THEY just made it prettier!

Lastly, its kind of fun to make you own screen saver. The link below is a video to show you how to make your own screen saver using photos you have on your computer now. NEAT!
Create A Screen Saver Using Windows XP/Vista
I hope this How-To Guide for Computer Beginners lesson on turning off the screen saver, and turn on the screen saver was helpful to you.
If you have any questions or comments please leave a comment in the section provided below.
You can also leave your email address in our subscribe box, and get all future lessons sent to you directly to your email!
Technorati Tags: turn on screen saver,turn off screensaver,start screensaver,how to change your screensaver,turn off screensaver xp,turn off screensaver vista
Loading


0 comments:
Post a Comment